


How to Read a Tee
“How Do I Read A Tee?”
At Pexhouse we get a lot of technical inquiries and a very common one is how to select or “read” a tee fitting. For a homeowner or even professional plumbers, it can be very confusing to figure out what tee is required for a particular application. As with many concepts in plumbing and hvac, there is a simple answer and then a much more nuanced explanation. If you read no further than this line, the simple answer for how to read a tee is as follows: Inlet x Outlet x Branch. The remainder of this article will use a series of examples and diagrams to illustrate the concept further. We will use the measurements 3/4″ and 1/2″ in this article, but keep in mind that this is universal for all sizes.
Before continuing any further, it should be noted that this concept applies to all material types including but not limited to PEX, PE-RT, Push-Fit, Copper, Malleable Black Iron, Brass, Stainless Steel, PVC, ABS and more.
In a general sense, a tee is a fitting configuration that has three openings or ports, the inlet (1), outlet (2) and branch (3). Often, they can also be referred to as the inlet, run and branch, as shown in the images below.
Example 1 – Straight Tee
In Image A, you see the inlet on the left hand side, the outlet or run is on the right hand side and the branch is on the bottom. In this first example, the inlet, outlet (run) and branch are all the same size and are ¾”. That would make it a ¾” x ¾”” x ¾” Tee or otherwise known as a ¾” Tee or a ¾” Straight Tee.
Image A © Pexhouse.com 2021
Example 2 – Branch Reducing Tee
Image B below shows a branch reducing tee. This means that when looking at the fitting as drawn, the port on the bottom is a smaller diameter than the ports on the left and the port on the right. For the purpose of this article it would then be a ¾” x ¾” x ½” Tee. When writing out the tee configuration, the branch is the last size listed. Sometimes this layout is referred to as ¾” x ½” Tee.
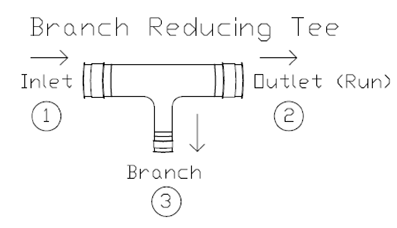
Image B © Pexhouse.com 2021
Example 3 – Run Reducing Tee
Image C below shows a run reducing tee. This means that when looking at the fitting as drawn, the port on the right is a smaller diameter than the ports on the left and the port on the bottom. For the purpose of this article it would then be a ¾” x ½” x ¾” Tee. When writing out the tee configuration, the run is the middle size listed. The reduced port has moved in the description which now makes it a different combination. By moving the numbers around you get different tee’s.
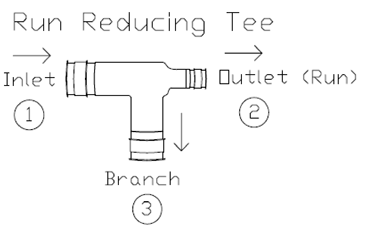
Image C © Pexhouse.com 2021
Example 4 – Branch and Run Reducing Tee
Image D below shows a branch and run reducing tee. This means that when looking at the fitting as drawn, the ports on the right and bottom are a smaller diameter than the port on the left. For the purpose of this article it would then be a ¾” x ½” x ½” Tee. It is worth noting that in some material and size applications it is possible to have the branch and run reduced to different sizes than each other (i.e 1” x ¾” x ½”)
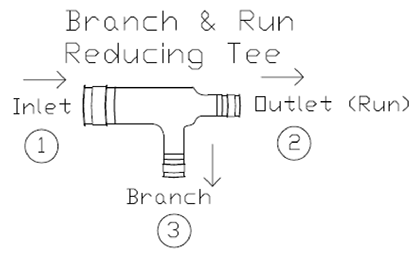
Image D © Pexhouse.com 2021
Example 5 – Branch Increasing Tee
There is a specialty type of tee as shown in Image E below, which actually has an increase in port size on the branch. This means that when looking at the fitting as drawn, the port on the bottom is a larger diameter than the ports on the left and right. For the purpose of this article it would then be a ½” x ½” x ¾” Tee. This is often called a bullhead tee. It is important to note that a bull head tee cannot replace a branch and run reducing tee.
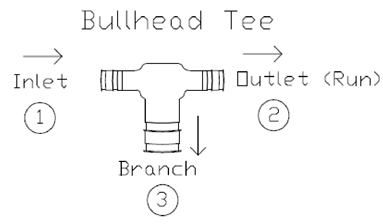
Image E © Pexhouse.com 2021
Each tee serves a purpose, and in many cases, they cannot be interchanged because of the required piping layout. That is why you need to make sure you are selecting fittings accurately for the job. By following the rules, tips and diagrams in this article, you will be sure to get the right material every time. Happy plumbing!
When sizing a system pressure drop, each fitting must be accounted for. For a quick reference of pressure drop through various fittings including tees, head over here